skip to main |
skip to sidebar
 My favorite recipe from the cookbook Herbcraft (see Monday's posting) is an unusual bar cookie made with rosemary—the herb symbolic of friendship and remembrance. These lumpy, bumpy bar cookies will fill your kitchen with the delicious scent of rosemary while they’re baking. Plus, they’re super easy to make. You can adjust the amount of rosemary to your taste—and of course, using fresh Rosemary is the best. I’m not a big fan of the taste of Rosemary myself, because it can be very overpowering—but for some reason I like the "evergreen" taste it adds to these chewy bar cookies.
Rosemary Squares- adapted from Herbcraft2 eggs
1 cup brown sugar
2 teaspoons vanilla
1 cup flour (I used whole wheat pastry flour)
½ teaspoon salt
1 teaspoon baking powder
½ dried powered rosemary (I used 2 teaspoons of finely minced fresh rosemary)
2/3 cup pecans or sunflower seeds or pumpkin seeds (I lightly toast them in a cast iron skillet and let them cool first)
1 cup raisins or currents or candied fruit
Beat eggs vigorously (I used an electric mixer to get them really fluffy). Add sugar gradually, then vanilla and the flour that has been sifted with salt and baking powder and into which you have stirred the rosemary (if you use fresh rosemary add it to the egg and sugar mixture). Fold in nuts and raisins. Bake in 8 x 8 inch pan which has been buttered and dusted with flour. Bake at 350 degrees for about 30 minutes and test with a toothpick (I bake them a few minutes longer, because I like the edges a little crispy). Remove from pan while warm (otherwise these cookies will want to stick to the pan), cool and cut into bars (squares or rectangles). It makes about 16 bar cookies.
Make a batch of Rosemary Squares this weekend for yourself or for a friend! These cookies are yummy with a big tall glass of milk or hot cup of Cambric Tea. Herbcraft has other unique recipes and a compendium of myths and information on herbs, and of course the charming illustrations by Win Ng. You can buy a copy of the book Herbcraft here for only a penny (yes, it's only 1 cent, plus shipping). Happy weekend!
A big Mr. Peacock thank you to Grace Bonney at Design Sponge! She featured Mr. Peacock's DIY Project on Wednesday. I'm glad it inspired people to try decoupaging. You can visit Design Sponge here. Pick-up a copy, if you haven't yet, of the November issue of Domino Magazine and see the lovely photo and article about Grace and her inspiring site. Also, keep an eye out, Mr. Peacock will be guest blogging on Design Sponge.
 A new home furnishings shop, New Deal, recently opened on 18th Street, in The Castro neighborhood, in San Francisco. Actually, New Deal isn’t really new, the shop just relocated from it’s previous 15 year location on Market Street, by Zuni Café. The new space is so charming and fresh that Mr. Peacock wanted to move in himself—it feels like a cozy, modern cottage in The Hamptons. The shop doubles as a home furnishings showroom and interior design office for the proprietor, Terje Arnesen. New Deal has an array of updated, traditional and contemporary styles—never too modern or too trendy.

 Mr. Peacock was drawn to the unusual "silver chromed linen" fabric Mr. Arnesen chose for this Louis style chair, which also happens to be his favorite fabric right now—Pirates Treasure by Brunschwig & Fils.

 New Deal stocks a beautiful selection of sofas, chairs, tables, lighting, mirrors, rugs and original artwork—all well edited by Mr. Arnesen's discerning eye.
 Right now, Mr. Arnesen, is loving all shades of gray with jewel tone accent colors and this "Damask" rug is a prime example.
 Mr. Arnesen originally hails from Norway, but now calls California his home. In addition to being a talented interior designer, he’s also quiet the bon vivant and peacock in San Francisco.
Mr. Peacock: Let's switch gears from interior design to menswear. How would you describe your style?
Mr. Arnesen: That naturally depends on where I'm going, whom I'm seeing, the nature of the social occasion, as well as how late it is. But generally: sophisticated, adventurous, unapologetic—but never trendy.
What's your favorite item currently in your wardrobe?
Three gray Dolce & Gabbana suits, all with a little sheen, and a pile of ties from Andrew's Ties in Milan.
Who do you consider a style icon?
The people I really consider style icons are all dead. Although, I like the crazy personal style of designer Kelly Wearstler.
Have you had any fashion disasters?
I've had more wardrobe malfunctions than I care to mention, especially during my 14 years of competitive ballroom dancing.
Whose your favorite menswear designer or brand?
I always end up buying a lot of Dolce and Gabbana because it fits my body type and I think it's the perfect combination of style, quality, and attitude. I wish I could wear more Dior and YSL but it's made for stick figures.
How old were you when you realized you were a "Peacock"?
I had barely turned 4 when I knew exactly what I wanted to look like. I lost the battle often with my mother who had a very strong opinion as well.
Is there any style or clothing item you absolutely disdain?
I hate anything that doesn't fit properly. Take the time and get your clothes altered! Otherwise you end up not wearing them and you always look bad.
Do you have any pet peeves about how most men dress in San Francisco?
San Francisco men DON'T dress. I'm excited every time I see a good outfit and it doesn't happen very often, although it's getting a little better. Take a look the next Friday night you're out having a good dinner and you’ll notice the state of men’s fashion in San Francisco—very nondescript.
Do you “archive” your favorite clothing items or get rid of them after their prime?
I keep certain items that were very good quality, or really identified certain periods of time, and that I possibly see wearing again at some point in time.
Any sartorial advice?
Put some effort into what you’re presenting to the world when you leave the house and own it! Why would you want to look like everybody else? Create your personal style based on what inspires you and run with it. Take what you like from current design and work into your own combinations.
New Deal is located at 4529 18th Street in San Francisco and can be reached at 415/552-6208. Check out their website (which will be re-launched in early 2009) for hours and additional information. New Deal can also custom order pieces that suit your needs. So stop by New Deal and see everything for yourself—tell him Mr. Peacock sent you!
 Here's a few goodies that are on my Autumn wish list:
1) Hurry, this little canvas duffle bag with green leather handles for $25.00 (and free shipping too) won’t last long! The bag is 22 x 10 x 14.5 inches. Buy one here.
2) These comfy, handmade ring boots from Quoddy Trail Moccasin Company in Maine will be your favorite shoes on rainy days. Warning: this small company has great products, but not the best customer service. Shipping can take up to 3 months and without any communication, but it's worth the wait. Order information here.
3) You know Mr. Peacock loves a good brooch and this "Captain Pin with Diamond Lapels" brooch by Digby & Iona would look fantastic pinned onto any gentleman's lapel. I can't resist this vintage, rough hewn styled piece made with oxidized silver and bronze, and of course diamonds. The touch of bling adds a modern and unexpected touch to this 1.5 by 1.25 inch pin. You can purchase it here.
4) I’m nuts about these charming wood acorn boxes at West Elm. The small acorn is 3.75"diam x 5.75"h and the large acorn is large: 6"diam x 9"h. Buy them here before they sell out.
5) This linoleum block printed kitchen towel with a quail, by artgoodies, would also make a very handsome over-sized napkin on your Thanksgiving table. This quail is just one of many different creatures this sweet etsy shop offers. Buy it here.
6) Mr. Peacock has always had a weakness for top hats and this loden green “Charles” velour top hat by Eugenia Kim makes me swoon! You can buy this beauty, and other great items, at the wonderful menswear boutique, BBlessing, in New York's Lower East Side. Click here to purchase this top hat.
 Cookbooks are another obsession of mine. One of my favorite series of cookbooks is the “craft” collection by Violet Schafer, sometimes co-authored by her hubby Charles, which include: Herbcraft (1971), Wokcraft (1973), Eggcraft (1974), Breadcraft (1974), and Teacraft (1975). Besides recipes, the authors include myths and folklore associated with the topic of each book. What makes these books really charming is the illustrations by the late San Francisco artist, Win Ng. His delicate drawings have clever details that make the cookbooks come to life. Mr. Ng illustrated four of the “craft” books. Barney Wan, the art director of British Vogue (in the late 1960's), illustrated Breadcraft, which has a different vibe than the rest of the series. Here's a few samples of Mr. Ng's illustrations.
 This beautifully stylized teacup with Lotus flowers is from Teacraft. These teacups would look handsome, framed and hung on a wall in in some cozy nook at your home.
 I love the dreaminess of this enchanted teacup from Teacraft.
 This whimsical fairy tale teapot is also from Teacraft. The fishing "prince" frog makes me giggle.

 This adorable lion and owl (and detail shot) is the illustration for chervil, from Herbcraft.
 Also from Herbcraft, this representation of Adam and Eve is for balm.
 This giant potted jungle is the illustration introducing the section “Herban Renewal” in Herbcraft, which I think is the best book in the series. You can buy a copy of Herbcraft or Teacraft here or here for only a penny—that's the bargain of the day!
As of late, Mr. Peacock has been adorning his blazers with a brooch or two, ala' 1985. Believe it or not, I'm not even a jewelry person. I don't wear any rings or things, just a humble watch. Let’s face it though, menswear doesn’t really change that much from year to year, like womens apparel. But adding a brooch is a nice refined way to add a little pizazz and personality to your standard male uniform, especially for festive occasions. Dare I say, it can still be masculine too, depending on your selection and how you wear it. A brooch can also look chic pinned onto a hat or even a denim jacket. Hopefully this will give you some inspiration for holiday parties—maybe you can raid you mom or grandmother's jewelry box.
 This dark and tarnished brooch I found at a flea market. I’ve always liked crown and key paraphernalia, so when I saw the crown and keys together—I couldn’t pass it up. The patina is very pleasing too. It looks great against tweed.
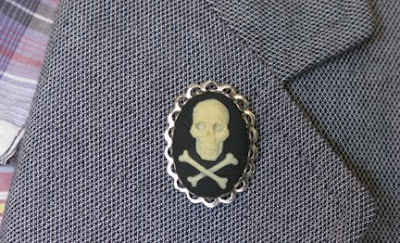 I don’t remember where I found this inexpensive, little skull and crossbones cameo, but I like it.
 I don’t even have to explain why I like this golden peacock beauty. It looks great perched on the lapel of my Harris Tweed blazer.
 I call this piece, from the 1950’s, my sparkly-fleur des lis-lady slipper brooch, because the shape reminds me of a fleur des lis and it also kinda looks like a lady slipper bloom. I save this piece for special, celebratory, evening occasions when I wear my black velvet suit. My mother gave me this brooch, about 20 years ago. I would routinely borrow it from her when I went clubbing, until she finally gave in and let me have it—with the prerequisite, “Don’t lose it!” I've lost a few great accessories over the years on some rowdy dance floors.
 I had to throw in this wonderful photograph of my mother, JoAnn, because, you guessed it— she's wearing the sparkly-fleur des lies-lady slipper brooch (I checked with my magnifying glass). Before my parents were married, my mother owned a nightclub/lounge, The Matineé, which had live bands and dancing—and she grew mint in the back of the club for her signature mint julep cocktails. I believe this photo was taken one evening in 1960 in the parking lot of the club with an unidentified customer, by an unidentified photographer. Whenever I wear this brooch, I think of my mom posing on the hood of this convertible car—and that makes the brooch even more special to me.
 This faux Roman coin medallion brooch was also my mother’s. It’s from the 1960’s and I like wearing it on my corduroy jacket. This brooch has got a bit beat up, but I think it adds more character to the piece.
 Continuing the coin theme, I wore this brooch, I found on ebay, to see this amazing performer a few weeks ago. I like the quiet, tinkling sound the small dangling coins make when it moves. I pinned it to a vintage black tuxedo jacket, my friend Roger gave me and wore a Ganesh t-shirt from the Bombay Bazaar, on Valencia Street.
 Ages ago, I collected vintage alarm clocks, Big Bens, etc...At some point I started taking the alarm clocks apart and turning the clock-faces into brooches. Somehow this one survived my gypsy lifestyle and I still wear it occasionally. I like the contrast of the whimsical clock-face on something really traditional—like a khaki blazer.
 Mr. Peacock saw this jaw-dropping brooch last spring at Vera Wang. It's been etched in my memory ever since. I would wear this piece on a vintage black calvary jacket I have from the turn of the century. The flower petals are made with trimmed feathers that have deep blue and green highlights. The stem, leaves and stamen are made with diamond studded platinum. The real question—do I want to buy a car or a brooch? This unusual goth beauty is a mere $30,000. I guess I'll stick with my collection of vintage brooches. I would hate to lose a $30,000 brooch on some rowdy dance floor.
 Mr. Peacock loves to collage! One uneventful weekend last year, I collaged the entryway ceiling in our apartment using black and white xerox copies. It’s a cheap and fun way to add some drama to a drab foyer! You could do a larger ceiling, but it would take more time, so I recommend starting with a small area first. If you rent or like to change things around—like myself, they’re relatively easy to remove. Just dampen the artwork with a wet towel and slide a blade or scraper under a corner and “peel them off.” Here’s how I created my decoupaged ceiling. (You can click on the image below to see the detail a bit better)
 1. Pick your pattern
First you want to decide your theme or subject matter. I called mine—The Birds and the Bees, even though I didn’t include any bees. I used birds, flowers, butterflies, and beetles. An object, or animal, or something that you can silhouette (cut out) works better than say a photo of “a wheat field.” Although you could simply cut interesting shapes from an image like “a wheat field” and make more of an abstract pattern with shapes. You could also use clip art from a Dover book. The possibilities are really endless. My ceiling is painted white, but you could also paint the ceiling a color and decoupage the black and white images over it.
 2. Find the images
I wanted to do something nature oriented, ie...The Birds and the Bees. So I selected some books on birds, flowers and bugs. I bookmarked pages I liked with a post-it.
3. Xerox
Then I went to the copy store and enlarged the images on a black and white Xerox machine. I used 11" x 17" size paper. You’ll have to play around a bit, adjusting the size and contrast to your liking. Don't worry if the copies look too gray or the dot pattern looks too prominent, you won't notice that after the next step. You could also scan images you like and play with them in Photoshop and then print them out at home.
 4. Cut
Then I carefully cut out the images from the Xeroxed pages and piled them into groups, ie birds, flowers, leaves, and bugs. I used two different pairs of scissors and an exacto knife (see photo below). Your first trimmed image might be a bit sloppy, but don’t worry, once it’s up on the ceiling, nobody will notice. And besides, you’ll become an expert at cutting these images after the first few are done. (I even like the cut out images against the wood floor in the photo above)
5. Clean your surface
I cleaned and wiped the ceiling with a mixture of hot water and TSP, and let it dry thoroughly. Don’t skip this step! It is important your surface is clean and dry, otherwise your beautiful collaged images will curl on the edges and not adhere to the ceiling.
 6. Glue
Then I got on my step ladder and just intuitively started gluing the cut out shapes to the ceiling, creating a organic “pattern” as I went. If you want it to be more structured, you could lay the pieces out on the floor before you start gluing. I used oversize glue-sticks and tried to cover most of the back surface of each piece, and gently rubbed it smooth when I pressed it to the ceiling. Be careful when you smooth the image, it can tear.
7.Decoupage
Actually I brushed on more of a light “wash” than a full on decoupage. I thinned some Elmer’s glue to a watery, but still sticky consistency. You want it thin enough to brush on and just lightly coat the surface and around the edges of each image. Normally when you decoupage, you would want a thicker consistency like Mod Podge, which you could also use (but thin out with some water). The glue "wash" will dry fairly quickly.
 8.Voila!
I think my ceiling is quite fetching. My photograph really doesn't do it justice and the light fixture is a bit distracting to see the final product in its full beauty. People ooh and ahh when they step into our home for the first time and notice the glorious "birds and bees" on the ceiling. It also adds some depth to the ceiling and makes the space feel taller. If you decide to decoupage your ceiling, send me a photo, I’d love to see what ideas you come up with!

 My favorite recipe from the cookbook Herbcraft (see Monday's posting) is an unusual bar cookie made with rosemary—the herb symbolic of friendship and remembrance. These lumpy, bumpy bar cookies will fill your kitchen with the delicious scent of rosemary while they’re baking. Plus, they’re super easy to make. You can adjust the amount of rosemary to your taste—and of course, using fresh Rosemary is the best. I’m not a big fan of the taste of Rosemary myself, because it can be very overpowering—but for some reason I like the "evergreen" taste it adds to these chewy bar cookies.


